-
Understanding Log Grading
Posted on September 26th, 2011 3 commentsIn the last post, we discussed what log is and why it’s used in digital cinematography cameras. Now we’re going to look at exactly how it’s implemented and what you should know about how to deal with log coded images.
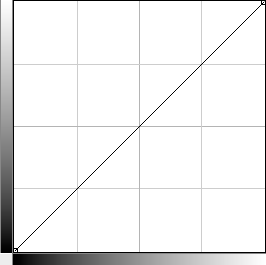
The easiest way to explain what’s going on is to do it graphically. If we take a “standard” image, one that looks proper to the eye, and plot the input values along an “x” axis and the output values along the “y” axis, the input values would equal the output values, creating a straight line on the graph. Here is that plot as a starting point.
 As you can see, there is no manipulation of the input values. The input and the output are the same. The image is simply passed through with no changes. Now, let’s take a look at a log curve.
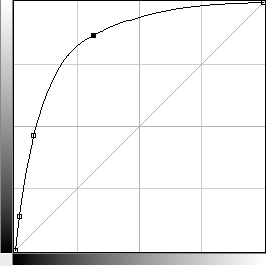
 Now the values have changed. As you might recall, in a logarithmic sequence, each value is the next power of the base value. For this illustration, the “x” axis represents the original values in an arithmetic progression, that is, 0 through 255. The “y” axis represents the base 2 log value of those original values, i.e., the power of 2 that equals the value on the x axis. What that means is that while there are 255 values along the x axis, there are only 8 values along the Y axis.The curve therefore becomes much steeper at the beginning, flattens out somewhat, then becomes very shallow at the higher values as more fractional values of the log number are used to illustrate a larger range of original values (the illustration is a bit exaggerated to make this more obvious). Since this isn’t really about mathematics – and certainly I’m no mathematician – all this really means is that the values of the image have been altered. In image terms, this gives you an image in which the lowest values have been raised, the middle values are higher but somewhat consistent, and the highest values have been “shallowed” somewhat. This means that the image will look light and flat, which is typical of the way log images appear. What’s important here is that while the lowest values have been raised, it has been done in a non-linear way, and while the highest values have been “squeezed together,” it has also been done non-linearly. Since ultimately you want an image that has the original greyscale as a starting point, these changes must be un-done to get back to the straight line version.
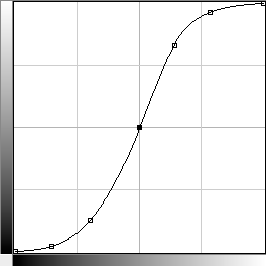
 This is how that’s done. Using an “s-curve” essentially reverses the effect of the log transform. The lower values are re-interpreted to start off much less steeply and gradually enter the “linear” part of the curve. At the upper range, proper contrast is restored by retaining the “steeper” part of the curve past the nominal white point. The middle of the curve is kept relatively linear, just as it was in the original, but with a steeper slope to counter what the log curve did. Many people dealing with log for the first time don’t really understand the need for this kind of approach in order to restore the proper greyscale, and adopt other methods based on visual cues that give a similar visual effect, but cause other image degredations in the process. I’m going to illustrate two of those approaches here.
 This is an illustration of what happens when you “crush the gammas.” Gamma is a power function as well, but it is based on the original straight line, linear curve. By moving the center point of that curve up or down, the midrange contrast is affected. Some colorists will take the log image and crush the gammas to restore proper contrast. As you can see here, that does to some degree emulate what the proper S-curve does, but only for the lowest values. The midrange is still lower than it should be, and the highest values will be very flat because the contrast is being restored in the wrong direction. Typically with this approach, the blacks and lower midrange can look good, but the brighter areas will have very little contrast. That usually affects faces that are properly lit, because typically lit fleshtones are at the upper midrange of the scale. So while this is a decent visual “cheat,” it doesn’t properly restore the greyscale of the entire image.
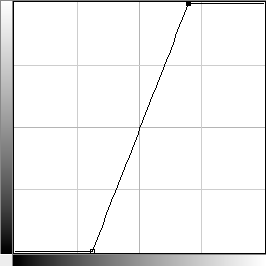
 The other typical approach is to crush the blacks and clip the whites. As you can see, this does tend to produce a midrange curve that is similar to that of the S-curve. The problem is that in the process, all of the black and white detail is being removed, and the transition from dark to midrange to bright is being exaggerated. While this is an accepted approach in “look creation” scenarios, in which detail and graceful falloff is less important than pure visual impact, it is not a proper way to get the most out of the original cinematography, in part because you’re basically removing more than half of the information in the original image.
It should be clear from these illustrations that the “proper” way to interpret a log image is to use an S-curve to “de-log” it when grading. That way, all of the original contrast is restored. There are basically 3 ways to do this, depending on the software you’re using. One way is to use a curve correction, available in most of the modern grading systems. This works well, and allows for changes, but it is a bit dangerous in that unless you know where those curve points should be, you can and likely will alter parts of the grey scale in an incorrect way. So that isn’t the approach I’d recommend for the less experienced colorist. A second way is to use an S-curve control, available on Assimilate Scratch and some other systems. This gives you a variable S-curve that allows some of the same flexibility as a user defined curve, but bases it on a properly shaped curve that can be varied in terms of its contrast. The third way is to use a lookup table, or LUT. A properly designed LUT gives you a predefined S-curve that is mathematically calculated to be correct. This makes it a bit more “foolproof,” but also inherently less flexible because you can’t change it. However, it is the method I would recommend for inexperienced colorists because it does what it’s supposed to do without possibility of error.
The LUT approach is often misunderstood by those who feel, for some reason, that what a LUT is supposed to do is yield a “perfect” starting point for every image. That is not the case. What a LUT does is transform the log curve back to a proper gamma corrected curve based on the particular display device being used, most often a monitor. In the case of an image that is a bit underexposed, this will likely cause the blacks to be crushed by the LUT, and in the case of an overexposed image, it will cause the whites to be clipped. This is where the misunderstanding comes into play. The LUT is not meant to be used as the first correction in a grading pipeline. If you place the LUT after an initial correction, you can then raise the blacks or lower the whites on the original log image prior to it being transformed by the LUT. The LUT will still do what it’s supposed to do, and you then have the option of grading prior to the LUT or after it as needed. This is the “secret” that many professional colorists (especially those who work in the digital intermediate world) know, and few inexperienced ones seem to understand. A LUT is not a color correction, just as a log image is not an image. It is a transform, and the log image is a container. The image needs to be “processed” by the LUT in order to appear properly to the eye.
In the context of this post, I’m leaving out some important points about LUTs, such as the application of a color matrix, print emulation, and device specific transforms. That will be discussed in another post. But for now, hopefully this allows for a better understanding of how log grading should work, and some of the pitfalls involved in “roll your own” solutions.
3 responses to “Understanding Log Grading”

-
Thanks for making it clear Mike! Great article!
-
It amazes me. that the only comment here is from five months ago. after two years in this game. I am truly astounded by this article.
and i see this same question being asked all the time. and to see it here so clearly is somehow shocking. thank You Mr Most. i can only guess. that you are so respected that no one have the balls to write anything. in fear of making an ass of themselves.However Alchemy? intrigues me still…
and of course. thank you very much for the blog. baselight you say? oh my…
-
Craig April 3rd, 2014 at 16:06
Awesome post, thanks for taking the time all those years ago to put it together. SO I do my correction first, then apply a LUT.
What happens if you do a LUT then a correction, is the LUT trashing information when it remaps the greyscale? or is it simply moving it into a squishier container, therefore not allowing for as precise corrections later?
Leave a reply
-
Postworld
post production in the file based age

Mark September 28th, 2011 at 10:56